This article explains how the ticket design of a ticket displayed in wallet can be adjusted.
Is the answer not in this article? Perhaps in the following: Ticket design general information
To make adjustments, a new template will need to be created, this can be done under the 'Templates' tab which can be found under the 'Settings' tab in the leftmost column.
On this page you will find a blue button with 'New Template' in the top right corner.
The following information can be entered using this button:

Template name
Here the ticket template can be given a name, it is useful to give it a clear name. So that the template is easy to find when it needs to be linked to the ticket.
Type
Different types of templates can be created, in this case a template is created for a ticket, so the ticket can remain here.
Target
In this case, a design for a wallet ticket is made, so it is also important to choose the wallet option here.
Format
Here there is the option to choose whether the design is made for an Apple or for a Google wallet. An Apple and Google wallet are separate, so a ticket design will have to be created for both.
When everything has been filled in, you can continue by clicking on the blue 'Create' button.
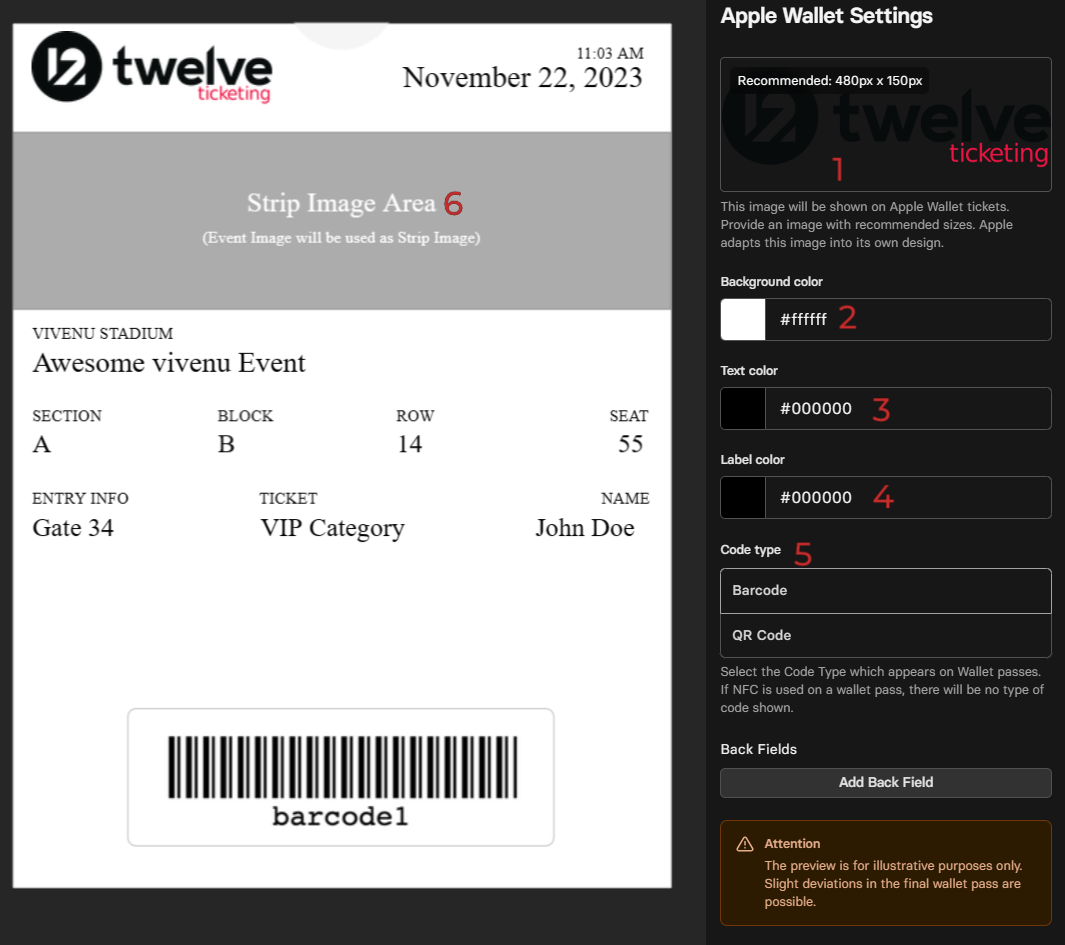
1. Logo
A photo or logo can be added here, this image will appear on the top left of the design. The recommended dimensions for this image are: 480 x 150 pixels.
2. Background color
Here you can choose a different background color for the design.
3. Text color
Here you can select a different color for the variable texts on the design.
4. Label color
Here you can select a different color for the texts that are always the same on the ticket.
5. Code type
Here you can choose whether a barcode or a QR code is shown on the design. We recommend choosing a QR code here, as the scanning time of the QR code is shorter than the scanning time of a barcode.
6. Strip Image Area
The logo of the event will ultimately be shown here.
Important! When everything has been set as desired, it is important to click on the blue 'Save' button at the bottom left of the screen.
How this design can be linked to the ticket type is explained in the following article: How do I link my design to a ticket?
Was this article helpful?
That’s Great!
Thank you for your feedback
Sorry! We couldn't be helpful
Thank you for your feedback
Feedback sent
We appreciate your effort and will try to fix the article