This article explains how to prepare the scanners so that the scanning staff can start working with the scanners.
Is the answer not in this article? Then take a look at the following article: General information: scanning tickets
There are two different ways to log in to the app:
1. Token Login - Logging in is done via a QR code, in this variant not everything is visible in the app.
2. User Login - Logging in is done via the login of a dashboard user, with this variant everything is visible in the app.
To prepare a scanner for the scanning staff, we recommend working via the Token login.
1. Token Login
In order to log in with a token, a token must first be created in the system. This token can be created under the 'Access control' tab which can be found under the 'Settings' tab
At the bottom right of the screen there is a button with 'Open actions', behind this there is a button with '+ New Device', click on this. You can also enter a name, then click on the blue 'Confirm' button to create a new device.
You can then click on the new device and this page will appear:
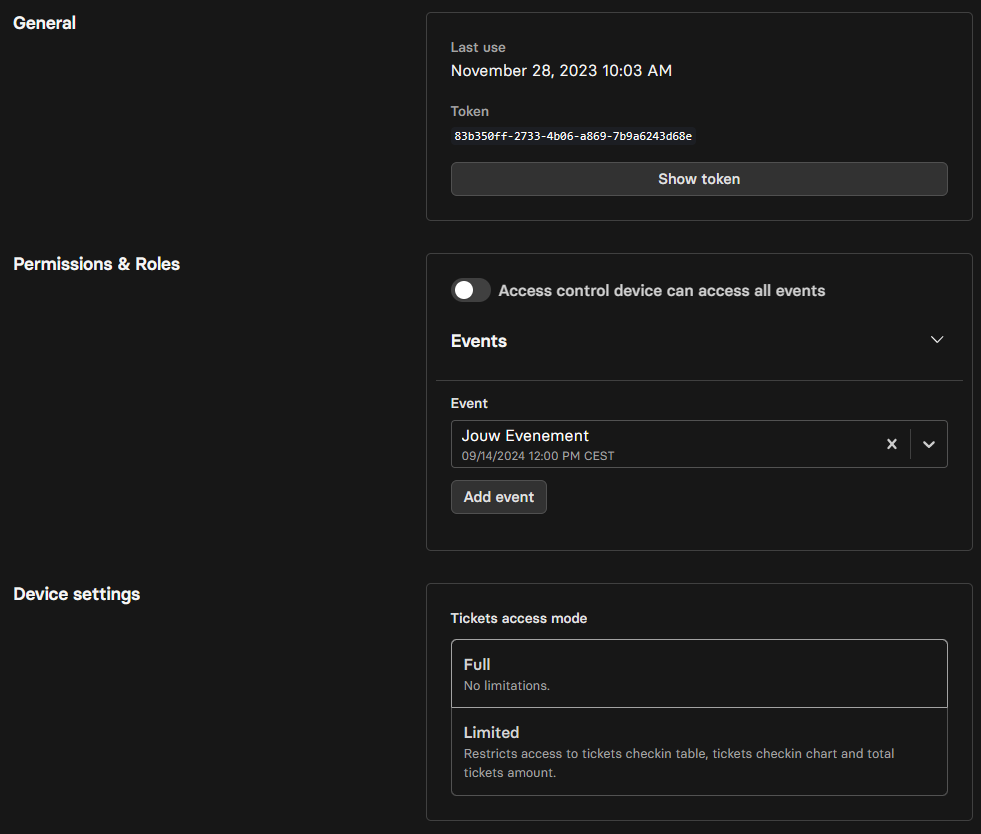
Permissions & Roles
When this button is enabled, the person scanning tickets can see all events. When this button is disabled, you can determine in advance for which event tickets will be scanned. Otherwise this will have to be determined on the scanner.
Device settings
Full - When 'Full' is enabled, scan staff can see scan details in the app. Information such as: How many people are inside, how many people have checked in and out.
Limited - With 'Limited' this is not shown in the app, so the scanning staff cannot look at this either.
Logging in with the new token
When 'Show token' is clicked, a QR code will appear. In the App you can now click on 'Scan Token' below the login screen. The app can now also be used to scan the QR code to log in.

1. Flash
If there is not enough light at the scanning location, the camera flash can be turned on with this button to make scanning easier.
2. Event settings
Here you can set the event if this has not already been done. The tickets can also be set here, i.e. which ticket types this scanner accepts. In this way, for example, it can be ensured that people cannot enter the event site with their parking ticket.
3. Checkin
Make sure the scanner is set to checkin when the tickets of the people entering the event are scanned.
4. Checkout
This option is not necessary for scanning tickets. With the check out option, you could scan all tickets leaving the event to keep track of how many people have left the event.
5. Scan QR or Barcode
When you click on this, the details of the person from whom the ticket has just been scanned can be viewed.
6. Scan page
By clicking on this image you will return to the scan page.
7. Settings
By clicking on this image you will go to the settings of the app. The following article explains more about this: How do I adjust the settings of my scanning app?
2. User login
This option allows you to log in with an account. The same data can be used for this as for logging in to the dashboard. You can of course also create a new account. You can read how to create a scan account in the following article: How do I create a scan account?
3. Scan colors
There are different colors that the scanner indicates after scanning a ticket, the colors are listed below:
Green - Valid, this ticket is valid
Orange - Valid, this ticket is valid but already scanned before
Blue - someone is checked out
Red - Invalid, this ticket is not valid for this event, or doesn't exist
Was this article helpful?
That’s Great!
Thank you for your feedback
Sorry! We couldn't be helpful
Thank you for your feedback
Feedback sent
We appreciate your effort and will try to fix the article